GSSS Patients’ Guide to
Anterior
Cruciate
Ligament
Reconstruction
Colin Walker (FRCS)
Frank Gilroy (BSc MCSP)
2nd Edition (2016) based on previous programme written for GSSS written and produced by C.Walker, W Leach, F, Gilroy & J. Keenan (2009)
Information on ACL Ruptures
The knee is the largest joint in the body. It is dependent on a number of ligaments to give it stability. A ligament is a structure that holds bones together and helps to control joint movement. One of the most important and frequently injured ligaments is the Anterior Cruciate Ligament (ACL).
The ACL, in addition to the Prosterior Cruciate Ligament (PCL), form the 2 main ligaments inside the knee. Both ligaments cross each other and are attached to the end of the femur and the tibia.
During activity the ACL controls movement between the tibia and the femur and provides stability to the knee.
How do you injure your ACL?
The ACL is usually injured during sporting activities, most commonly during football, rugby, skiing or basketball. Suprisingly, most people damage their ACL without any direct contact, rather a sudden twisting injury. If the injury is as a result of contact, it is more common to injure other ligaments within the knee as well.
At the time of their intial injury people frequently feel or hear a ‘pop’ or ‘snap’ and experience sudden pain with an immediate swelling of their knee and an inability to continue playing.
People who injure the ACL are prone to episodes of the knee buckling and giving way which often gives them problems during sporting activities and even during day to day activities. Either at their initial injury or subsequently, it is possible to injure other structures within the knee as well. This includes the medial collateral ligament, cartilage (meniscus) and articular surface.
How is an ACL rupture diagnosed
Usually the diagnosis can be made from the history and examination. In the early stages after the injury, the examination can be difficult because it is hard for the patient to relax sufficiently due to the pain.
It is important that people have an x-ray after their injury to be sure there are no associated broken bones. An MRI scan can be very helpful in confirming the diagnosis of the ACL injury and identifying other associated soft tissue injuries.
ACL Rupture Options
What happens after the diagnosis of an ACL rupture is made? In the early stages after an ACL injury, it is important that patients carry out Protection, Rest, Ice, Elevation and Compression (PRICE). This will reduce the initial swelling and help to ease the pain.
How is an ACL rupture treated? Except in exceptional circumstances, the ACL cannot heal or be stitched back together. The treatment choices are therefore to live without an ACL or have an ACL reconstruction – a process by which a tendon is used to make an ACL.
Do i always need surgery after an ACL rupture? Many people will manage to live without a functioning ACL. With appropriate rehabilitation, they will be able to compensate for their ACL rupture by maintaining good muscle tone. Often patients will find that their knee starts to become unstable or they will experience a lack of confidence when performing twisting and turning sports. Therefore many people who choose not to have surgery tend to reduce their level of activity or avoid certain sports. People who do not have surgery to stabilise their knees are known to be at increased risk of re-injuring the knee-particularly MCL sprains, cartilage damage and damage to the articular surfaces. There is, however, no evidence that they are at a higher risk of develop- ing osteoarthritis compared to those who have surgery.
If I decide to have surgery, when should it be done? Surgery should only be performed when all the swelling has settled and the knee has regained full movement. Physiotherapy can be very helpful in speeding up this process.
Who should have ACL surgery? Surgeons believe in a range of different indications for surgery. The surgeons at the GSSS believe that patients who wish to continue to play sports which involve sudden directional changes are more likely to benefit from ACL surgery, particularly if they are determined to return to their previous level of sport. There are advantages to performing this surgery within 3 months of injury
Some people, understandably, prefer to attend physiotherapy in the first instance, and try to avoid surgery. If these patients subsequently experience episodes of instability or other symptoms they can still have ACL surgery at a later stage.
Age is not a barrier to ACL reconstruction although older patients are less likely to perform activities which provoke episodes of instability and are therefore less likely to require surgery.
Even if returning to sport is not an issue for a patient there are still two groups of patients who should almost always have their ACL reconstructed. If a patient has ruptured their medial collateral ligament (MCL) at the same time as their ACL, the ACL should be repaired (but not the MCL). Secondly, there are a small number of people who have sustained a large cartilage tear at the same time as their ACL injury. If it is possible to repair the cartilage rather than remove it, it is important to reconstruct the ACL as soon as possible to ensure the cartilage repair heals.
The Surgical Technique
Most surgeons prefer to replace (or reconstruct) the ACL with the patient’s own tendon as the graft material. There are two commonly used techniques, the hamstring tendon and the bone-patellar bone (BTB). The choice is largely dependent on the surgeon’s preference and there is no evidence that the results of one technique are better than the other.
Both types of graft must be harvested through an open incision. The rest of the procedure is then performed using the arthroscope (keyhole surgery). The torn ACL is removed, tunnels are drilled through the bone on both sides of the knee and the graft is passed up the tunnels and fixed in place. The graft eventually performs the functions of an ACL.
What happens to the tendon that is used for the graft? There are four hamstring tendons on the inside part of the leg. Two (semitendinosis and gracillis) are used for the graft. In time, these removed tendons will re-grow but during this process, the other two tendons do much of the work of the harvested tendon.
Post-Surgery Information
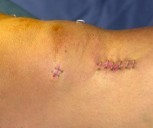
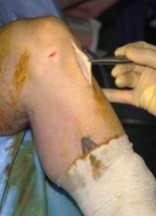
What size are the scars after surgery? The scars from the arthroscopy are usually less than 1cm. The scar from the tunnel and the hamstring graft harvest is typically 3cm long. The scar from a bone-patellar tendon graft is typically 9cm long. The illustration shows typical incisions at the end of hamstring ACL reconstruction surgery
Are there any complications associated with this surgery? Unfortunately there can be complications with any surgery. The most common complication is local numbness of the skin adjacent to the incision and failure of the reconstruction which happens in about 5% of people.
There are other rarer complications including infection, patellar tendon rupture and patellar fracture. Up to 20% of BTB patients and 8% of patients with hamstring reconstructions are left with some pain at the front of the knee while running and climbing stairs. Deep vein thrombosis as with any other surgery can be a complication, causing swelling and pain in the calf caused by a clot in the deep veins in the leg. During hamstring tendon harvest a nerve giving sensation to the inside of the calf (saphenous nerve) can be bruised causing numbness in this area.
How long am i in hopsital? Most patients are able to go home on the day of their operation. Some, however, will need to stay overnight
What factors help make a good result? Obviously it is important that your surgery is performed well by an experienced surgeon. Other than this we believe that the most important factor to ensure a good result is a commitment to effective rehabilitation, closely monitored by an experienced physiotherapist.
Rehabilitation
‘We believe that the most important factor to ensure a good result is a commitment to effective rehabilitation, closely monitored by an experienced Physiotherapist.’
You will need to commit to regular physiotherepy, especially early in the rehabilitation process – on average 14-16 visits over a 9 month period.
Returning to work and sport
The below is a guideline as to how soon you can return to particular activities. Your return will be guided by your surgeon and physiotherapist.
These times are only guidelines. The exact progression may vary depending on the individual. Every patient’s rehabilitation is monitored by the physiotherapist and surgeon. You are advised not to return to full activity too early. Over stressing the graft too early may increase the risk of graft failure.
Immediate Post Operative (IPO) Rehabilitation 1-7 Days
Criteria to Progress: Immediately post- operative
Aim: Good control of pain and swelling and comfortable weight bearing with crutches
Guidelines for Stage 1
Take painkillers and anti-inflammatory medications, as advised by the doctor
Rest the knee with leg elevated as much as possible when not performing phsiotherapy exercises
Try to limit the amount of time you spend walking by prioritising activities
Use your crutches until instructed not to do so by your physiotherapist.
Ice the knee for approximtely five times per day for 20mins
Continue wearing tubi-grip during the day, REMOVE AT NIGHT
Do not remove your dressing until you see the doctor
Precautions
No crossing legs
No running
No twisting or pivoting movements
No jumping
Remember this programme is just a guideline. You may progress more rapidly or slowly through the programme as guided by your surgeon, therapist and your pain.
Range of Motion and Stretching Programme
1.Knee Cap- Patellar Mobilisations 3-4 times daily
Sit with your knee straight and relaxed. Take hold of your knee cap.
• Move it side-to-side for 2-3 minutes • Move it up and down for 2-3 minutes
2. Bending/ Flexing in Sitting Repeat 10 times 3-4 times a day
Sitting with your back supported. Slide your heel towards your buttock. Use a scarf, a belt or a towel under your foot to assist you. Hold for 10 seconds.
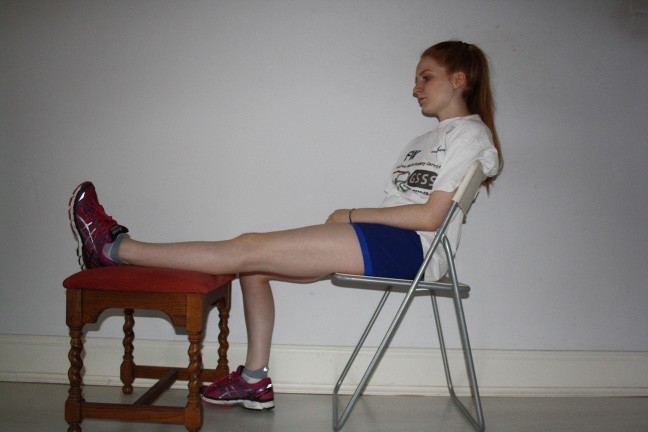
3.Straightening/ Extension Hold for 10 minutes x 2 daily. Sit with your knee unsupported and your foot on a raise or on a stool/ chair. Allow the weight of your leg to straighten the.
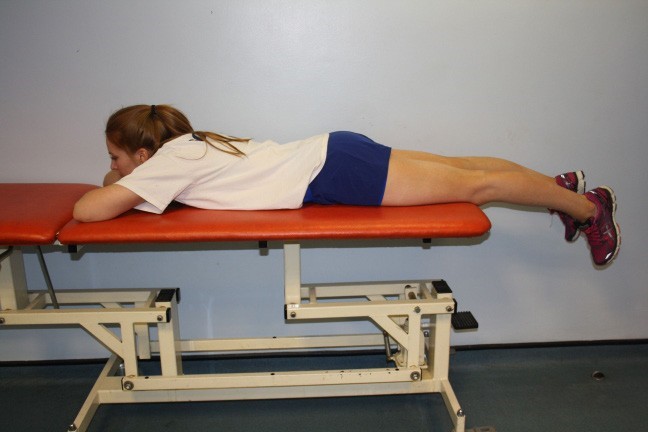
Straightening/Extension in Lying-Hold for 10 minutes x 2 daily
Lie face down on a bench/bed with your feet over the edge. Let the weight of your leg straighten your knee
Strengthening programme
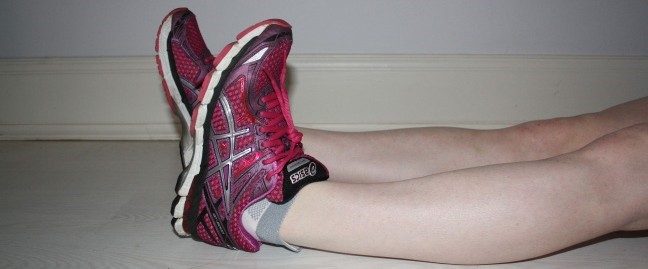
5.Ankle Pumps 3- 4 times daily, 10 reps
Straighten involved leg. Bend ankle slowly toward shin hold for 2 seconds. Point toes away from shin, hold for 2 seconds.
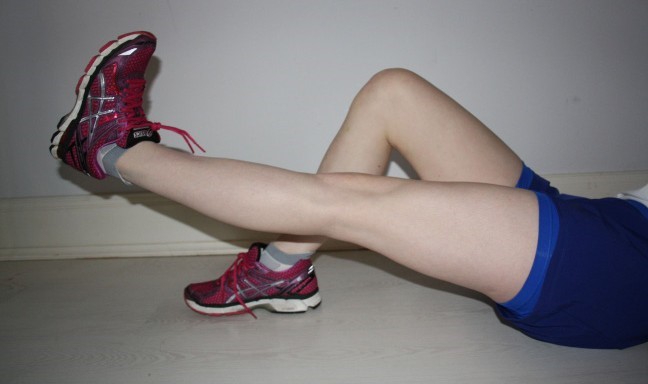
6.Quads Set and Straight Leg Raise 10 reps, 3-4 times daily, hold for 5 seconds
With a raise under your heel, tighten your thigh muscle until your leg is straight. If you achieve full extension of the knee then slowly lift the leg up six inches (without letting it roll in. Relax and repeat.
7.Quads Set in standing 3-4 times daily, 10 reps, hold for 5 seconds
Standing up with feet hip width apart. Tighten up your thigh muscle and press the knee out straight.
8.Hamstring Sets 1-2 sets, 10 reps, 3-4 times daily, hold for 5 seconds
Bend your knee to 20 degrees. Contract your hamstring muscles without moving your knee by digging your heel into the ground.
General Mobility
9.Walking with Crutches After your operation you will be walking with the help of crutches. Place your crutches forward, step forwards with your operated leg, brace your knee straight and step with your healthy leg. Limit your walking to the necessary chores. You can progress off crutches as your physiotherapist advises.
10.Stairs with Crutches Lean on the crutches and take a step up with your healthy leg. Then take a step up with your operated leg and bring the crutches up onto the step.
To go down put your crutches one step below. Then take a step down with your operated leg. Lean on the crutches and take a step down with your healthy leg onto the same step as your operated leg. ALWAYS GO ONE STEP AT A TIME.
Phase 1 Rehabilitation Weeks 1-2
Criteria to progress onto Phase 1: • Good control of pain and inflammation • Comfortable walking with or without crutches.
Aim: • Normal gait without crutches and knee extension as agreed with your surgeon. • Return to sedentary/ desk work (Be aware that time must be set aside by both yourself and your employer to allow you to work through your rehabilitation).
Guidelines for Phase 1:
• Continue icing knee several times a day for 15-20 minutes, if it is tender or swollen. • Continue using tubi-grip to reduce the swelling. • Elevate your leg often when sitting. • Limit your walking to important activities.
Precauctions:
• No running • No twisting or pivoting movements • No jumping
Remember exercises must not be progresses onto the next phase unless pain levels are stable or improving
Range of Movement and Stretching Programme
11.Calf/ Achilles (towel stretch) 2-3 times daily, 3-5 reps, hold 20- 30 seconds
With your knee straight and using a towel, belt or scarf, slowly pull your toes up toward your shin. Feel the stretch in your calf.
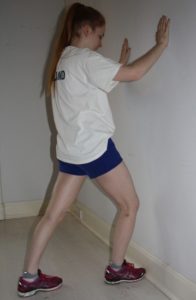
12.Calf/ Achilles (runner’s stretch) 2-3 times daily, 3-5 reps, hold 20- 30 seconds
Stand facing a wall. Put your operated leg behind you with the other leg bent in front of you. Lean your body forwards toward the wall, keeping the heel of the operated leg down and the knee straight. Feel the stretch on the calf of the straight leg.
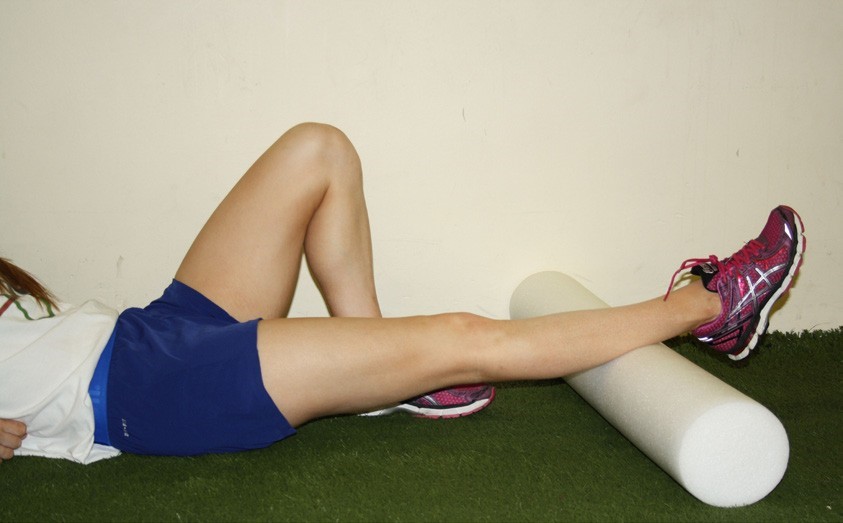
13.Quads Stretch in Prone Lying (PRONE KNEE BEND) 2-3 times daily, 3-5 reps, hold 20- 30 seconds
Lying face down with a towel, belt or scarf around your ankle, keep your lower back straight, bend your operated knee and pull your heel towards the buttocks. * alternatively you can use your un- operated leg to help bend the knee.
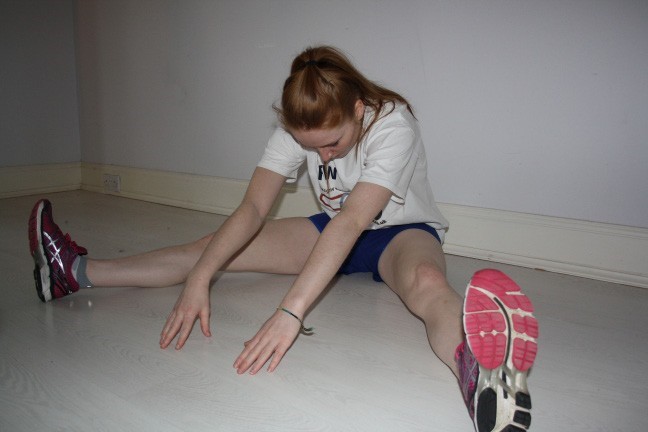
14.Sitting Hamstring Stretch 2-3 times daily, 3-5 reps, hold 20- 30 seconds
Sitting, maintaining a straight body position, with your operated leg out in front of you, reach forward and attempt to grasp your ankle or your toes. Feel the stretch at the back of your leg.
Strengthening Programme
Continue with the strengthening exercises from previous phase. Add the following exercises:
15.Hip Abductions 3 times daily, 5-10 reps, hold 5 seconds
Lie on your side, keep the leg on the floor bent and the upper leg straight. Lift the upper leg straight up with the heel leading the movement.
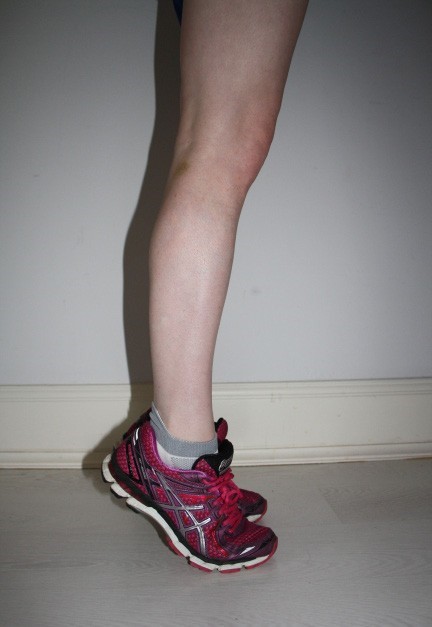
16.Toe/ Heel Raises 3-4 times daily, 20- 30 reps
Stand with your feet shoulder width apart. Raise up on to toes, then down and back onto heels, lift toes straight up and repeat.
Phase 2 Rehabilitation Weeks 3-6
Criteria to progress onto phase 2
Able to walk without crutches
Able to walk up stairs without an aid
Able to fully straighten the knee
Aim: To be able to bend the knee fully
Guidelines for phase 2:
• If you do office work or are able to do light duties, you may return to work. (4 weeks) • You may consider driving when you are allowed by your physiotherapist or surgeon. • Continue icing the knee up to three times each day and continue wearing • your tubigrip. • Elevate the leg as much as possible. • 10 minutes at least twice a day stretching.
Precauctions:
• Avoid crossing your legs and twisting activities. • No running. • No twisting or pivoting movements. • No jumping.
Remember exercises must not be progressed onto the next phase unless pain levels are stable or improving.
Range of Motion and Stretching Programme
Spend 10 minutes on stretching twice daily. (Hold each stretch for 20-30 seconds.) Continue with Patellar Mobilisations. Continue with IPO and Phase 1 stretches. Add following stretches to Stretching programme.
17.Groin Stretch 2-3 times daily, 3-5 reps, hold 20- 30 seconds
Sitting, maintaining a straight back. Slowly open the legs and lean forwards slightly from the waist. Feel the stretch in your groin.
18. Soleus Stretch 2-3 times daily, 3-5 reps, hold 20- 30 seconds
Stand with the leg to be stretched behind the other leg. Push your heel down, while bending the knee to stretch your Achilles tendon.
19.Lying Hamstring Stretch 2-3 times daily, 3-5 reps, hold 20- 30 seconds
Lying on your back, keeping your head and shoulders on the floor, slowly raise your surgical leg and grasp the limb above or below the knee, to extend the stretch, pull the toes up towards the head. *a towel can be placed onto the foot and gripped with the hands as a variation of this stretch.
Strengthening Programme
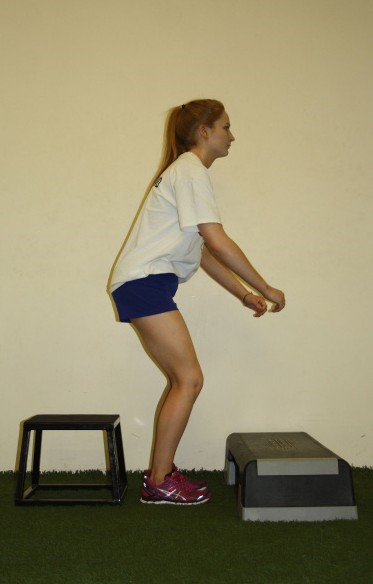
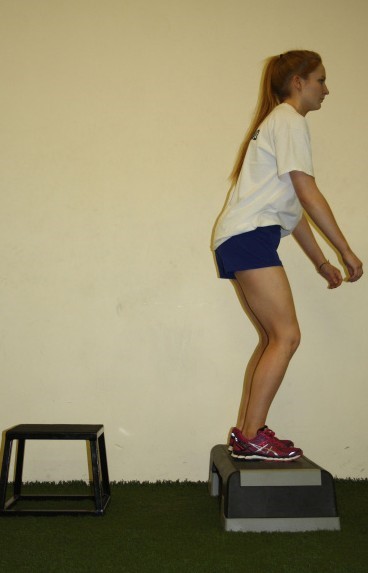
20.Calf Raises over Step 2-3 times daily, 10- 15 reps
Stand with both feet on a step and your heels over the edge. Contract your quadriceps and your hamstrings. Keeping your knees straight, go up and down on your toes.
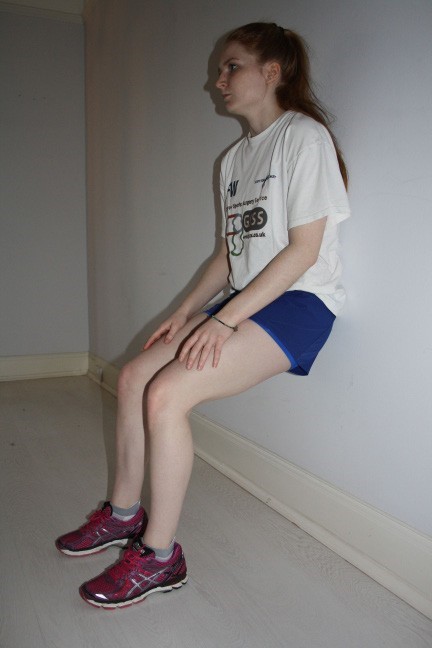
21.Standing Wall Slides-Quad Strengthening 2-3 times daily, 10- 15 reps
Stand with your back leaning against a wall and your feet about 30cm from it. Keeping your quads and hamstrings tight, slowly slide down the wall until both knees are bent to 50 degrees. Slowly straighten your knees and return to the starting position.
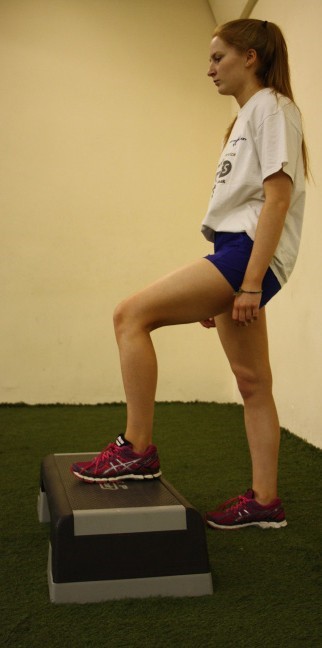
22.Step Ups, Forwards and Sideways -Quad Strengthening 2-3 times daily 20-40 reps Lead with operated leg
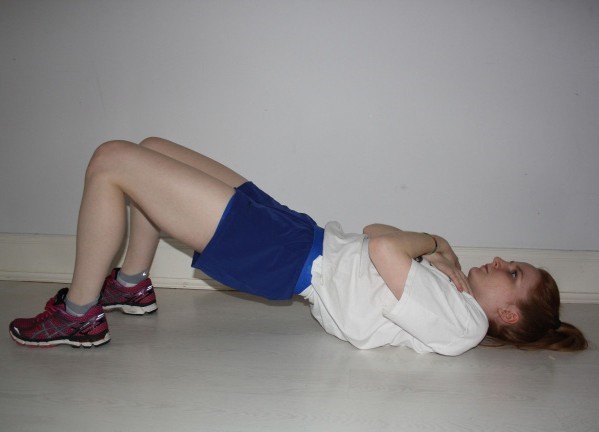
23.Glutenal & Hamstring Strengthening Bridges, 2 times per day
Lie on back with both knees bent. Tighten your quads and hamstrings, squeeze your buttocks together and lift your bottom off the floor. Work up to being able to hold this position for one minute.
Progress the exercise by holding both your hands in the air.
Choose one of the hamstring exercises from the below
24.Hamstrings 2-3 sets of 10- 15 reps
Stand next to a bench and bend over it. Bend the operated knee to 90˚and then lift the whole leg behind you a little and lower it again. Keep your buttocks tight throughout.
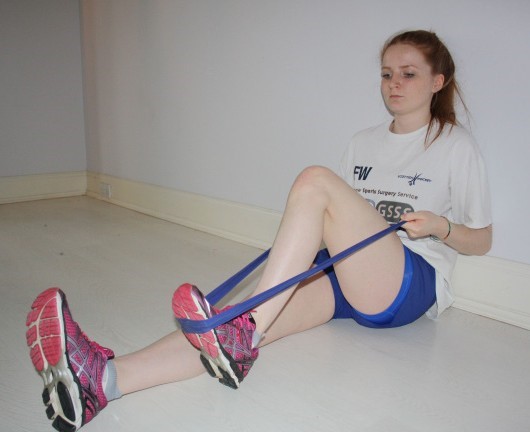
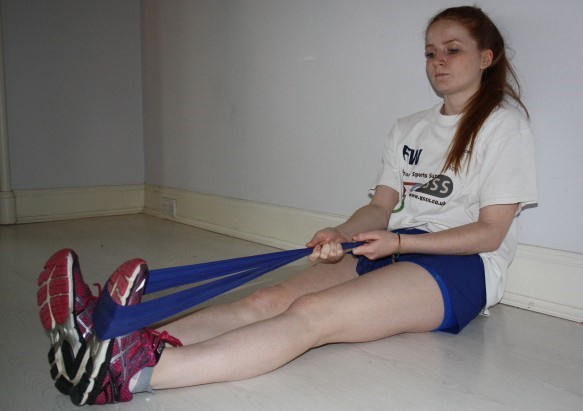
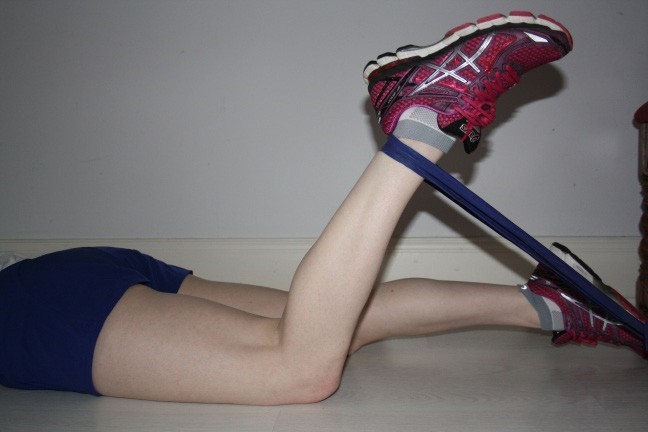
25.Hamstrings in sitting using a theraband 2-3 sets of 10- 15 reps
Lying on your stomach, pull the band by bending your knee. This exercise can be progressed in subsequent phases by changing the colour of thereband used for resistance. Start with the lighter bands and progress over the next 4 weeks.
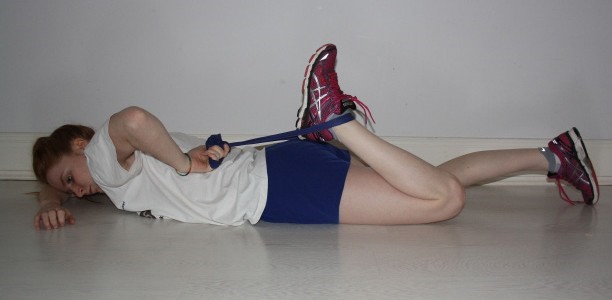
26.Hamstrings in prone using a weight 2-3 sets of 10- 15 reps
Prone lying, with a light ankle weight around your ankle. Move your heel towards your buttocks as far as possible under control and slowly lower to the start position. This exercise can be progressed during subsequent phases by using heavier ankle weights for resistance.
Proprioceptive/ balance and coordination programme
27. Wobble Board 2-3 times daily, 5-10 minutes
Stand on the wobble board. Practise balancing and do not let the sides of the board touch the floor.
28.Standing on 1 leg 2-3 times daily, 5 minutes practising
Standing on the operated leg lift the other leg of the floor and try to balance.
Exercise Progression. 1. Hold onto a wall with one hand. 2. Fold your arms across your chest. 3. Close 1 or 2 eyes. 4. Place a beanbag on your head
General Mobility and Cardiovascular Programme
29.Aqua Jogging 2-3 times weekly, 20-30 minutes
Use an aqua jogger belt in the deep end of the pool. Your feet should not hit the bottom. Mimic the jogging motion using your arms and legs
30.Static Cycling 2-3 times weekly, 20-30 minutes
Seat height should be comfortable. Slowly use your good leg to facilitate the movement of your surgical side.
Increase the speed as tolerated.
THERE SHOULD BE NO RESISTANCE ON THE BIKE.
Phase 3 Rehabilitation Weeks 6-12
Criteria to progress onto Phase 3: Full extension of the knee, with almost full flexion.
Aim: • Build up on leg strength. • Improve balance and coordination. • Able to balance on operated leg for 30 seconds with eyes closed
Guidelines for phase 3
If you do a moderate manual job, you may return to work (week 6-12) as agreed with your
You may now commence swimming. (No breast stroke)
Precautions:
At this stage your graft is still weak. Continue to avoid any twisting activities and progress your exercises gradually.
Avoid crossing your legs and twisting
No
No twisting or pivoting
No
No quadriceps
Remember exercises must not be progressed onto the next phase unless pain levels are stable or improving.
Range of Motion and Stretching Programme
Stretch before and after exercising. Hold each stretch for 20 – 30 seconds.
• Do Runners calf Stretch • Do Soleus stretch • Do Groin Stretch • Do Hamstring Stretch (From previous Rehab Phases)
31.Quadriceps Standing Stork Stretch 2-3 sets, 30 second hold
Standing, maintaining a straight body position, take hold of your forefoot and pull your heel towards your buttock. Hold on to the wall as required.
Hip flexors
2-3 sets, 30 second hold. Extend the hip further by taking the knee backwards to place more emphasis on the hip flexors.
Stregthening Programme
Add resistance to the following exercises from Phases 1-3 by using hand weights or theraband resistance
Exercise 7. Quads Set and Straight Leg Raise: Add a small weight to your ankle
Exercise 16. Hip Abductions: Add a small weight to your ankle
Exercise 21.Calf Raises over step: Hold a small weight in each hand
Exercise 22. Wall Slides: Hold a small weight in each hand
Exercise 23. Step ups, Forwards and Sideways: Hold a small weight in each hand
Exercise 25. Hamstrings: Attach an ankle weight to your foot
Exercise 26. Hamstrings in Lying: Increase the theraband resistance
Exercise 27. Hamstrings in Prone: Increase the number of ankle weights (0.5kg per week)
Add the following exercises:
28.Gluteal and Quad Strenthening Sit to Stand 2-3 sets, 15- 20 reps
Stand up from sitting and sit down again without using your arms.
Exercise Progressions:
Use a lower chair
Hold small weights in each hand
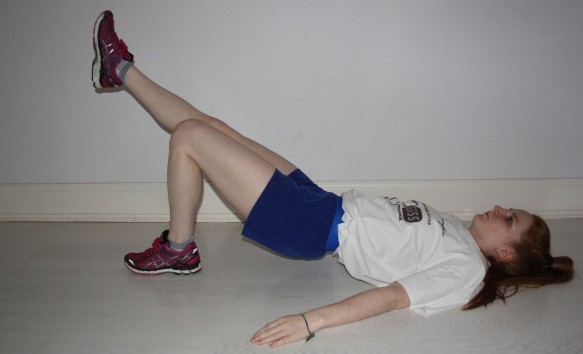
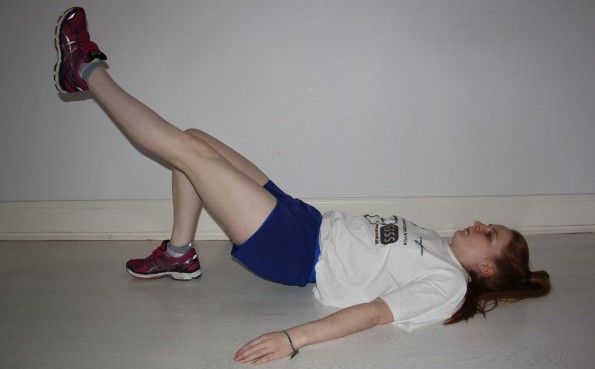
33.Gluteal & Hamstring Strengthening Leg Bridges- 2 times per day
Lie on back with both knees bent. Tighten your quads and hamstrings,
squeeze your buttocks together and lift your bottom of the floor. Now lift your unoperated limb off the floor. Work up to being able to hold this position for one minute
Repeat with the other limb.
Progress the exercise by holding your hands in the air.
Start with the legs nearly fully extended. Move the heels toward the buttocks as far as possible and under control. Maintaining this control, slowly extend the knee back to the starting position. DON’T ALLOW THE KNEES TO HYPEREXTEND.
Exercise Progressions: • Increase the resistance. • Use just one leg.
Ensure that the back is straight and supported and your legs are inside and pushing outwards. Carry out full range of movement when opening and closing the legs, under control.
Exercise Progression: • Increase the resistance.
Proprioception, balance and coordination programme
38.Single Leg Stands 2-3 sets daily, 30-40-50 reps
Standing on the operated leg, lift the other leg from the floor and try to balance. (Do not twist your knee).
Exercise Variations: a. Bounce a ball against a wall or throw it to a partner and catch it on its return. b. Practise dribbling the ball around your operated leg, in a clockwise and then a counter clockwise direction. c. Create your own variations with your physiotherapist specific to the requirements of your sport e.g. Tennis volleys against wall, rugby passes etc.
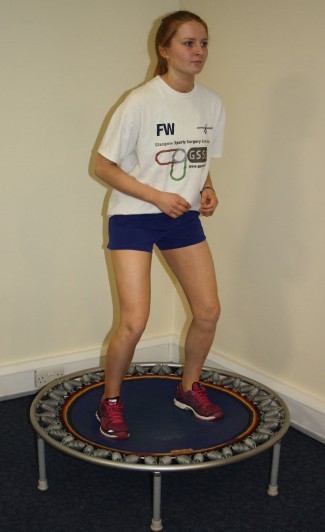
Exercise Progressions: Stand on the operated leg, while on a trampoline or rehabilitation cushion and aim to balance for 30 seconds. Progress: a. Hold onto a wall with one hand. b. Fold your arms across your chest. c. Close 1 or 2 eyes. d. Place a beanbag on your head. e. Repeat activities 1 & 2 above f. Create your own variations, while supervised by your physiotherapist.
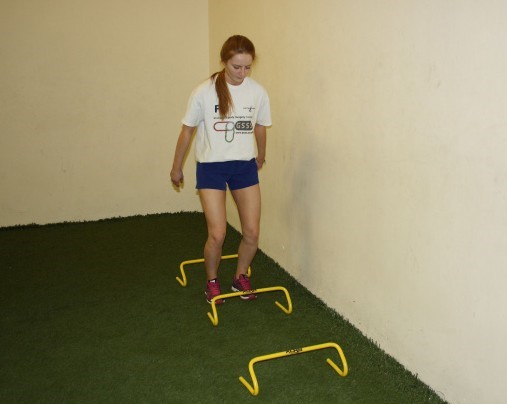
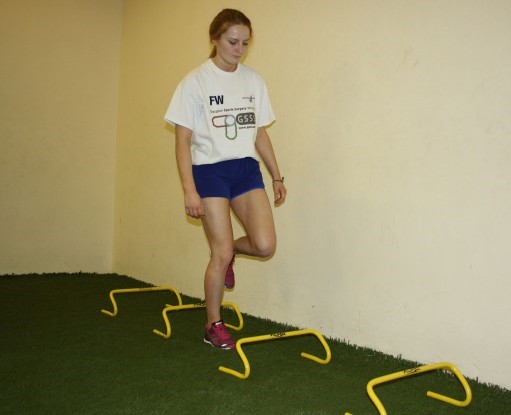
39.Line Walking 2-3 sets daily, 10-15 reps
Walking slowly along a line, placing one foot in front of the other (as if on a tightrope). Try to keep to the line.
Variations: 1. High knees 2. Fold your arms across your chest. 3. Tip-toe walking. 4. Close one or two eyes. 5. Walk backwards. 6. Walk sideways. 7. Place obstacles in your path and step over them.
General Mobility and Cardiovascular Training
Continue with Aqua-jogging and increase to 30 minutes.
Bike Static bike with resistance When beginning resistance, 30-45minutes Start with minimal resistance, 60 – 80 rpm. Increase resistance as tolerated.
Static bike- Interval Training 3x weekly, 30-45minutes
Treadmill Walking With incline
2- 3 times weekly, 20- 30 minutes
Incline set between 7º and 12º, begin slowly, take normal strides and keep your feet light.
Rowing 1-2 times weekly, 15-20 minutes
Ease ito rowing by not fully extending your knees and not
Swimming 2- 3 times weekly, 20- 30 minutes Front Crawl only NO BREAST STROKE. Exercise Variations: • Backcrawl • Use a kickboard to increase leg workout
Cross trainer 2-3 times weekly, 15- 20 minutes Ease into training by not fully extending your knees
Stepper 2 times weekly, 20- 30 minutes Begin with a short stepping motion and easy resistance. Use your hands to support your weight. Never let your feet come off the pedals or let the pedals hit the bottom.
Phase 4 Rehabilitation Weeks 12-24
Criteria to progress onto Phase 4
• Full range of motion of the knee • Excellent unsupported single leg stand • Good strength and grasp of gym programme
Aim: • Build up on power and aerobic capacity • Emphasise functional retraining • Ability to perform exercises unilaterally (using your operated leg only) • Comfortable sitting on back of heels. (Week 16) • Able to jog for 30 minutes (active patients only) • 2km treadmill run in under 12 minutes (Week 24) (active patients only)
Guidelines for Phase 4:
If you do a heavy manual job, involving working on ladders or rooftops, you may return to work (weeks 16-20) as agreed with your consultant.
If you display full range of movement, good muscle control and no swelling, You may return to light sports (golf).
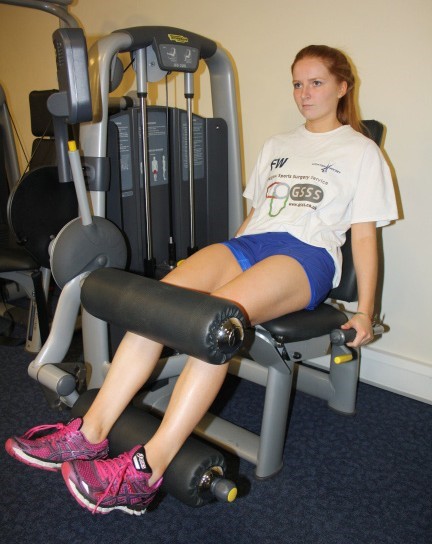
Sitting on a chair with an ankle weight/theraband around your foot (or at the quadriceps extension machine), pull your toes up, tighten your thigh muscle and straighten your knee. Hold for a few seconds and slowly let your knee bend.
Proprioceptive/ Balance and Coordination Programme
Continue with the previous balance activities in Phase 3
42. Side Lunge (lateral lunge) 2-3 sets, 10-15 reps
Stand with feet wide apart and toes pointing forward. Step out to the left, keeping your toes pointing straight ahead and your feet flat. Progress by sitting back down onto your left leg, keeping your right leg straight and the weight on the left foot. Squat as low as comfortable, keep your right leg straight and hold this position for 2 seconds. Return to the starting position and repeat. Then alternate with your opposite leg.
43. Lunges 2-3 sets, 10-15 reps
Stand with perfect posture and your legs hip width apart. Take a step forward with your operated leg only and squat down. Pushing down through this foot, return to the starting position and repeat. Then alternate with the opposite leg.
Progressions. 1. Hold small weights in your hands. 2. Progress gradually to multidirectional lunges.
General Mobility and Cardiovascular Programme
Once it has been established that you have adequate muscle strength, endurance and control, a running program as the example set out below can be started in agreement with your Physiotherapist and your Surgeon.
Session
Reps
Walk Duration
Run Duration
1
6
4min 30secs
30secs
2
6
4min
1min
3
6
3min 30secs
1min 30 secs
4
6
3min
2mins
5
6
2min 30secs
2min 30 secs
6
6
2min
3min
7
6
1min 30secs
3min 30secs
8
6
1min
4min
9
6
30secs
4min 30secs
10
30 minutes continuous
Progress by building up your pace from 1⁄2 to 3⁄4 to full pace.
Once you are able to run for 30 minutes without pain and can manage 2km in under 12 minutes, the following sprint drills can be commenced, if your sport/ activity or lifestyle requires it.
The following sprint drills can be commenced, if your sport/ activity or lifestyle
Starting postion should be different for each run.
Remember your running programme must not be progressed if you are experiencing pain, swelling or other symptoms at any level. Remember the programme is just a guideline and not everybody is expected to be at this level.
Phase 5 Rehabilitation
Month 6 Onwards
Criteria to progress onto Phase 5:
• No pain/ swelling. • Normal function furing activities of daily living. • Ability to comfortably sit on back of heels. • Uneventful participation in low risk activities (swimming, jogging, golf, low-impact aerobics).
Aim: • No pain/ swelling. • Re-introduction to sport specific drills. • Symmetrical hop scores compared with non-operated leg. • Symmetrical balance. • Symmetrical movement quality. • Psychological readiness. • Succesful completion of “End of Stage Rehabiliation Testing’ with physiotherapist. • Return to sport.
Prior to return to sport you will undergo end stage rehabilitation testing with your qualified physiotherapist. This end stage testing asseses balance, hop performance, risk of re-injury and psychological readiness to return to sport.
Precautions:
You should always undergo final testing and should never return to sport without the agreement of your surgeon or physiotherapist.
Remember exercises must not be progressed onto the next phase unless pain levels are stable or improving.
Strengthening Programme and Plyometrics
Discontinue these exercises or reduce them if experiencing any pain or swelling.
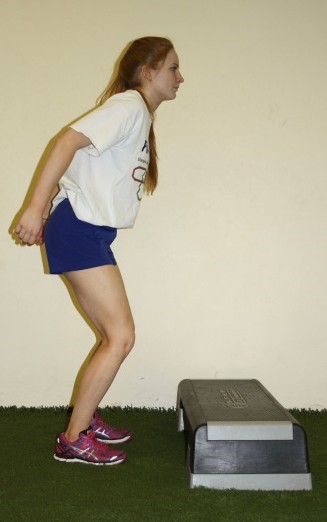
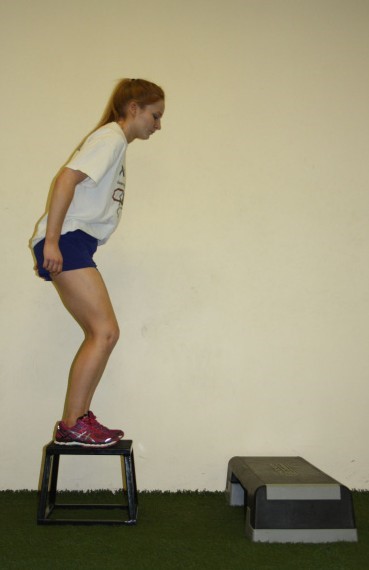
44.Box Jumps 2-3 sets, 10-15 reps
Stand in front of a secured box or platform. Jump onto box and immediately back down to same position. Immediately repeat. Jump back and forth from floor and box as fast as possible, keeping landings short.
Exercise Variations: • Jump sideways down to side of box. Jump back onto box then jump down to the other side of the box. Jump back onto the box and repeat. • Jump completely over the box from side to side as fast as possible. Exercise Progressions: • Build up to 2 sets of 30 reps. • Increase speed. • Use single leg.
45.Bounding Stand in front of a short box or platform. Place one foot on edge of box. Jump up high and land with opposite foot on edge of box and other foot on floor. Immediately repeat. Variations: • Make the platform higher • Repeat without a step (skipping on the spot).
46. Depth Jumps 2-3 sets, 10-15 reps
Building up to 2 sets of 30 reps.
Stand on top of a high box, close to the front edge facing a second box. Jump from the platform, landing on both feet between the platform and the box. Jump off the ground as fast as possible onto the box.
Progression: • Increase height of plat form as ability improves. • Use only one leg.
47.Hurdles 2-3 sets, 10-15 jumps
Stand facing collapsible hurdles, barriers or cones (30-90cm). Squat down and jump over hurdle with feet together using a double arm swing. Upon landing immediately jump over next hurdle. Keep landings short. Hurdles should be collapsible to prevent injury.
Progressions: • Increase height of barrier. • Increase space between hurdles. • One legged hopping
Proprioceptive, Balance and coordination programme
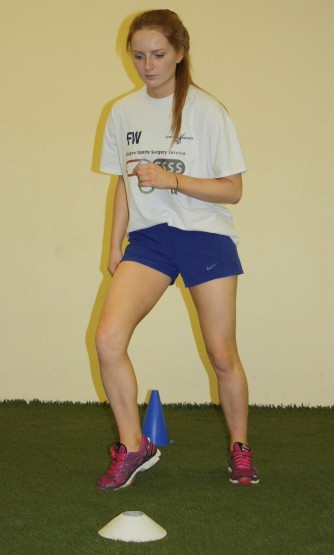
You should use cones to mark out the circuits below. Progress shearing activities over a six week period. Do each curcuit in both directions.
49. Cones are placed 5m apart in a straight line. The player completes a shuttle run at full pace, turning alternately to the left and to the right and sprinting backwards or forwards. This should be repeated 10 times.
50. Set 4 cones in a cross, each 10m apart. Stand in the centre (0) and side step laterally to the cone on your right (1) then side step to the cone on your left (2) and return to (0). Then run backwards (3), sprint forwards (4) then run backwards to (0) and repeat.
Variations: Perform this exercise while doing cariocas (crossed side step running) times.
End Stage Rehabilitation Testing
The return to sport is dependent on the surgeon and is different for each individual. We aim for a return to most sport by nine months after your operation.
These tests should be supervised and measured by an appropriately trained healthcare professional.